블로그 이미지
내게 능력 주시는 자 안에서 내가 모든것을 할수 있느니라 - 빌립보서 4 : 13 - happydong

카테고리

Happydong (1363)
프로그래밍 (156)
01.C#기초 (4)
02.C#고급 (13)
03.ASP.NET (28)
04.HTML&Script (17)
05.Silverlight (38)
06.C 언어 기초 (2)
07.iOS (14)
08.Java (5)
09.SQL (8)
10.컴퓨터보안 (10)
11.패턴이야기 (3)
12.유니티3D (1)
13.Ubuntu (7)
14.Node.js (6)
MUSIC (16)
인물 (3)
Utility (10)
세미나 소식&내용 (22)
IT뉴스 (18)
운동 (830)
CAFE (10)
Life (282)
Total
Today
Yesterday


Get Microsoft Silverlight


ListBox Control
를 이용해서 간단한 위와 같이 만들어 보겠습니다. 전에 어떤 분이 훈스닷넷에 질문을 오려주신 내용인데요. 그때 만들었던 예제 소스입니다. 그럼 설명 필요 없이 소스부터 천천히 보면서 알아 보도록 하지요.

ListBox Control

<ListBox x:Name="DemoList" HorizontalAlignment="Left"  ScrollViewer.HorizontalScrollBarVisibility="Hidden" ScrollViewer.VerticalScrollBarVisibility="Hidden" VerticalAlignment="Stretch" Cursor="Hand" Style="{StaticResource DemoListBoxStyle}" ItemContainerStyle="{StaticResource DemoListBoxItemStyle}">

</ListBox>


일단 ListBox컨트롤을 하나 생성합니다. 저는 ScrollViewer의 속성을 다 Hidden으로 잡았습니다. 스크롤이 안보이도록 한거죠. 또 코드를 보시면 Style ItemContatinerStyle StaticResource로 스타일이 잡혀있는 것을 볼수가 있을 겁니다. 그럼 저 스타일쪽에 움직임의 답이 있지 않을까... 하는 생각이 바로 드실겁니다.^^ 그렇게 생각하셨던 분들이라면 역시 대단하신 분들이 아닐까 감히 생각해 봅니다.

그럼 일단 Style 소스를 보도록 하지요.

Style Source

<Style x:Key="DemoListBoxStyle" TargetType="ListBox">

<Setter Property="ItemsPanel">

<Setter.Value>

<ItemsPanelTemplate>

<!-- 리스트박스의 페널은 스텍페널 입니다. Orientation : Horizontal-->

<StackPanel Orientation="Horizontal"

VerticalAlignment="Stretch"

HorizontalAlignment="Center" />

</ItemsPanelTemplate>

</Setter.Value>

</Setter>

</Style>


Style 코드는 짧지요. 모.. 이정도쯤은 손으로 짜도 짤수 있지 않을까 생각해드네요. Style을 만들고 key 이름만 지어주고,TargetType 지정해주고, ItemsPanel 속성을 StackPanel로 지정하고...정말 눈으로 봐도 직관적 으로 알수 있지 안나요.  결론적으로 저는 ListBox ItemsPanel속성을 StackPanel Orientation Horizontal로 사용하고 있을 알수 있을 것입니다. 이렇게 한다면 리스트 아이템이 가로로 나타나겠지요.

그럼 이제 ItemContatinerStyle 소스를 보도록 하겠습니다.

ItemContatinerStyle Source

<Style x:Key="DemoListBoxItemStyle" TargetType="ListBoxItem">

<Setter Property="Padding" Value="1"/>

<Setter Property="HorizontalContentAlignment" Value="Left"/>

<Setter Property="VerticalContentAlignment" Value="Top"/>

<Setter Property="Background" Value="Transparent"/>

<Setter Property="BorderThickness" Value="1"/>

<Setter Property="TabNavigation" Value="Local"/>

<Setter Property="Template">

<Setter.Value>

<ControlTemplate TargetType="ListBoxItem">

<Grid x:Name="grid" Width="20" Background="{TemplateBinding Background}">

<vsm:VisualStateManager.VisualStateGroups>

<vsm:VisualStateGroup x:Name="CommonStates">

<vsm:VisualStateGroup.Transitions>

<vsm:VisualTransition GeneratedDuration="00:00:00.1000000"/>

<vsm:VisualTransition From="Normal" GeneratedDuration="00:00:00.1000000" To="MouseOver"/>

</vsm:VisualStateGroup.Transitions>

<vsm:VisualState x:Name="Normal"/>

<vsm:VisualState x:Name="MouseOver">

<Storyboard>

<DoubleAnimationUsingKeyFrames BeginTime="00:00:00" Duration="00:00:00.0010000" Storyboard.TargetName="grid" Storyboard.TargetProperty="(FrameworkElement.Width)">

<SplineDoubleKeyFrame KeyTime="00:00:00" Value="50"/>

</DoubleAnimationUsingKeyFrames>

</Storyboard>

</vsm:VisualState>

<vsm:VisualState x:Name="Disabled">

<Storyboard>

<DoubleAnimationUsingKeyFrames Storyboard.TargetName="contentPresenter" Storyboard.TargetProperty="Opacity">

<SplineDoubleKeyFrame KeyTime="0" Value=".55"/>

</DoubleAnimationUsingKeyFrames>

</Storyboard>

</vsm:VisualState>

</vsm:VisualStateGroup>

<vsm:VisualStateGroup x:Name="SelectionStates">

<vsm:VisualState x:Name="Unselected"/>

<vsm:VisualState x:Name="Selected">

<Storyboard/>

</vsm:VisualState>

</vsm:VisualStateGroup>

<vsm:VisualStateGroup x:Name="FocusStates">

<vsm:VisualState x:Name="Focused">

<Storyboard/>

</vsm:VisualState>

<vsm:VisualState x:Name="Unfocused"/>

</vsm:VisualStateGroup>

</vsm:VisualStateManager.VisualStateGroups>

<ContentPresenter HorizontalAlignment="Stretch" Margin="{TemplateBinding Padding}" x:Name="contentPresenter" VerticalAlignment="Stretch" Width="Auto" Content="{TemplateBinding Content}" ContentTemplate="{TemplateBinding ContentTemplate}"/>

</Grid>

</ControlTemplate>

</Setter.Value>

</Setter>

</Style>


~정말 소스가 기네요. 이정도면 손으로 작성하는것 보다는 블랜드를 이용하는 것이 좋겠네요. ItemContainerStyle은 아이템 항목 컨테이너에 적용될 스타일을 지정합니다. 일단 아래 그림을 통해 블랜드로 어떻게 만들었는지 확인 해보록 하지요.

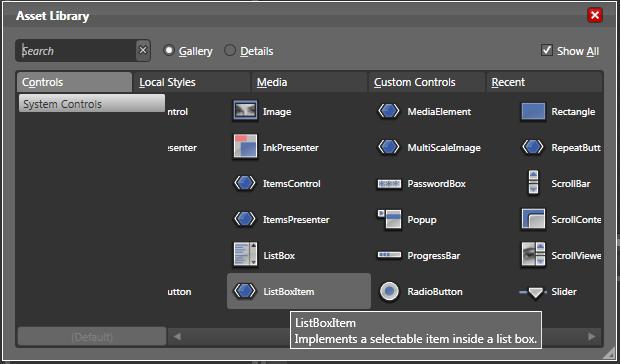
그럼 아래 그림과 같이 Control들 중에서 ListBoxItem를 선택하도록 합니다.


사용자 삽입 이미지

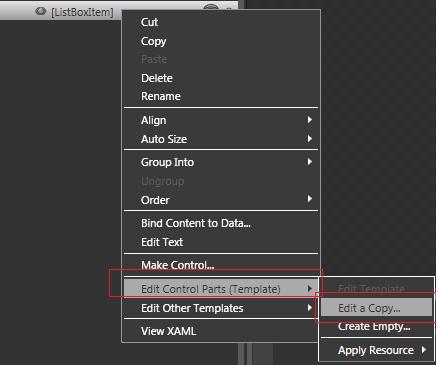
ListBoxItem컨트롤을 더블 클릭하면 블랜드 화면에 생성된 것을 확인 하실수 있습니다. 그럼 마우스 오른쪽을 클릭해서 Edit Control Parts(Template) >> Edit a Copy.. 를 클릭합니다. (아래 그림 참고)


사용자 삽입 이미지


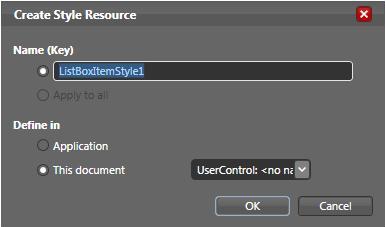
그럼 아래와 같은 화면이 나타날 텐데요.


사용자 삽입 이미지


Name(key)에 스타일을 이름을 설정해 주도록합니다. 그리고 Application쪽에 스타일을 둘 것인 것 아니면, 현재 페이제에 스타일을 둘 것인지를 선택합니다. 범용적으로 사용되어야 할 스타일이라면 Application쪽에 두는 것이 좋겠지요. 일단 아무데나 선택을 하고 OK를 클릭하세요.


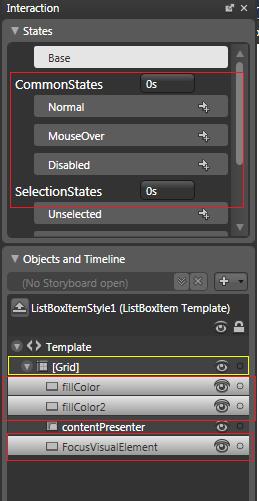
사용자 삽입 이미지


위 그림과 같이 저는 필요없는 Rectangle을 잡아서 삭제 해버렸습니다. 그냥 ContentPresenter만 남겨두었지요. ContentPresenter는 지우면 안될 녀석입니다. 주의 하세요. 그리고 Grid를 선택하고 위의 MeuseOver상태일때와 Normal, Disabled 상태일때 각각의 크기를 지정해 주도록 합니다. 이렇게까지 하면 끝입니다.


이제 테스트 할 수 있는 아이템을 .cs단에서 만들어서 테스트 해보면 되겠네요.

테스트 아이템은 아래와 같습니다.


Test Code

List<Rectangle> items = new List<Rectangle>()

            {

                new Rectangle(){Fill = new SolidColorBrush(Colors.Red)},

                new Rectangle(){Fill = new SolidColorBrush(Colors.Yellow)},

                new Rectangle(){Fill = new SolidColorBrush(Colors.Orange)},

                new Rectangle(){Fill = new SolidColorBrush(Colors.Green)},

                new Rectangle(){Fill = new SolidColorBrush(Color.FromArgb(100,213,236,191))},

                new Rectangle(){Fill = new SolidColorBrush(Color.FromArgb(100,253,218,180))},

                new Rectangle(){Fill = new SolidColorBrush(Color.FromArgb(100,165,149,185))},

                new Rectangle(){Fill = new SolidColorBrush(Color.FromArgb(100,138,42,4))},

                new Rectangle(){Fill = new SolidColorBrush(Colors.Blue)},

                new Rectangle(){Fill = new SolidColorBrush(Colors.Black)}

            };

DemoList.ItemsSource = items;


여기까지 하셨다면 위와 같은 컨트롤이 만들어 졌을 겁니다.

지금까지 읽고 따라해주셔 감사합니다~!

Posted by happydong
, |


  Dependency Property (의존 속성)

실버라이트 2에서는 기존의 CLR(공용 언어 런타임)속성의 확장인 Dependency Property(의존 속성)를 이용해서 매번 자동적으로 속성의 값이 변경시킬수 있도록 지원해 줍니다.즉, 부모의 값이 변경이 되면 자식의 값이 같이 변경될수 있도록 할수 있는 것이라고 할수 있겠군요. 이런 방법을 이용해 Silverlight Application를 구현하면 바인딩모델로 만들어 쉽게 값을 설정하고 변경할 수 있으며, 개발자 입장에서는 유지보수가 편리할수 있습니다.
 Dependency Property는 기존의 CLR속성으로 노출되며, 내부적으로는 DependencyProperty구현 되어 있어 외부에서는 모를수 있습니다. 그러나 실버라이트 컨트롤들은 거의 대부분이 DependencyProperty로 구현되어 있어 리소스 및 스타일이라든지, 애니메이션, 기타값을 설정하는 부분에 바인딩으로 처리될 수 있습니다.

 Dependency Property의 주요 특징

 . 매번 자동적으로 속성의 값을 바꾼다. (다른 외부적인 값에 의존해서 값이 결정됨)
 . 기존의 CLR의 확장

 Dependency Property를 이용한 CustomComtrol

 간단하게 Dependency Property를 이용한 커스텀컨트롤을 만들어 보았습니다. UserNameCustomComtrol인데요, 사용자의 이름을 입력 받는 커스텀컨트롤이 될 것 입니다. 그럼 하나하나 코드를 보면서 알아보도록 하겠습니다.

Property 선언

public class UserNameCustomControl : Control

{

public String UserName

{

get { return (String)GetValue(UserNameProperty); }

set { SetValue(UserNameProperty, value); }

}

...나머지 코드는 아래에서

}


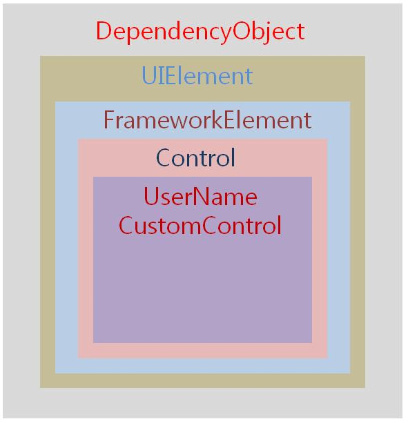
DependencyProperty의 값을 설정하거나 반환하기위해서는 DependencyObjectSetValue메소드와 GetValue메소드를 이용하여 값을 설정해 주거나 반환해 주어야 합니다. 그렇다면 DependencyObject는 어디에서 받아올지 궁금해 할수가 있겠군요.  실버라이트에서 거의 모든 컨트롤들이 UIElement를 상속받는데, UIElement를 DependencyObject를 상속 받아 구현된 클래스입니다. 즉, 제가 예제로 만든 UserNameCustomControl는 Control을 상속받아 구현됐는데요, Control클래스는 FrameworkElement 클래스를 상속을 받고, FrameworkElement 클래스는 UIElement 클래스를 상속을 받지요. (아래 그림 참고)

사용자 삽입 이미지


UserNameProperty는 DependencyProperty에서 선언된 필드명 입니다. 그럼 DenpendencyProperty 함수 선언은 어떻게 하는지 알아 보도록 하지요. 코드는 아래와 같습니다.

DenpendencyProperty 함수 선언

public static readonly DependencyProperty UserNameProperty =

DependencyProperty.Register(

"UserName",

typeof(String),

typeof(UserNameCustomControl),

new PropertyMetadata(new PropertyChangedCallback(UserNameCustomControl.OnUserNamePropertyChanged)));


 첫번째 라인에 보면 Static으로 선언하고, 정적일 것이기에 readonly로 지정하여 DependencyProperty를 생성한는 것을 보실수 있을겁니다.
 두번째 라인부터는 DependencyProperty 클래스의 Static메소드인 Register메소드를 호출하여 Silverlight속성 시스템에 등록 하는 코드입니다. Register함수는 4개의 파라미터를 선언해 주어야하는데요, 아래 표를 참고 하셔서 보시면 될 것 같습니다.

속성

설명

Name

등록할 속성의 이름

PropertyType

속성의 타입

ownerType

속성을 포함한 부모의 타입

typeMetadata

속성 메타데이터 지정

(보통 콜백(Callback) 함수를 지정함)


마지막에 typeMetadata는 지정하지 않을수도 있습니다. 즉, null로 지정이 가능합니다.그리고 필요에 따라 CallBack함수를 만들어서 사용할 수도 있습니다. 그럼 다음은 CallBeck함수를 어떻게 지정하는지 알아 보도록 하겠습니다.

CallBeck 함수

private static void OnUserNamePropertyChanged(DependencyObject d, DependencyPropertyChangedEventArgs e)

{

UserNameCustomControl userNamecontrol = d as UserNameCustomControl;

string newUserName = (string)e.NewValue;

string oldUserName = (string)e.OldValue;

}


위 코드를 보시면 OnUserNamePropertyChanged함수에는 2개의 파라미터(Parameter)를 받을수 있음을 확인 하실수 있을 것 입니다. 그리고 다음 코드를 보면 DependencyObject를  UserNameCustomControl로 캐스팅하는 코드인데요, 이렇게 캐스팅한 컨트롤을 이용하여 값이 변경되었을때 필요한 일들을 정의하면 되겠습니다. 그리고 DependencyPropertyChangedEventArgs함수에서는 NewValue함수와 OldValue함수가 있어서 현재 변경된값과 변경되지 전의 값을 확인 할수도 있습니다. 이렇게 해서 UserNameCustomControl이 어느정도 완성이 되었습니다. 이제 원하는데로OnUserNamePropertyChanged에서 값을 변경해 주거나 설정해 주면 되겠습니다.

아래 코드는 위의 코드들을 하나로 나타낸 코드입니다.(참고)

전체 코드 보기

public class UserNameCustomControl : Control

{

public String UserName

{

get { return (String)GetValue(UserNameProperty); }

set { SetValue(UserNameProperty, value); }

}


// Using a DependencyProperty as the backing store for UserName.  This enables animation, styling, binding, etc...

public static readonly DependencyProperty UserNameProperty =

DependencyProperty.Register(

"UserName",

typeof(String),

typeof(UserNameCustomControl),

new PropertyMetadata(new PropertyChangedCallback(UserNameCustomControl.OnUserNamePropertyChanged)));


private static void OnUserNamePropertyChanged(DependencyObject d, DependencyPropertyChangedEventArgs e)

{

UserNameCustomControl userNamecontrol = d as UserNameCustomControl;

string newUserName = (string)e.NewValue;

string oldUserName = (string)e.OldValue;

}

}


처음으로 실버라이트를 접하는 사람들에게는 정말 이해하기 힘든 부분일수 있습니다.(저 역시 그랬으니까요) 그러나 실버라이트를 제대로 공부 하려면 정말 꼭꼭 알아야하는 내용입니다. 이렇게 알고 DependencyProperty를 잘 이용하면 바인딩모델로 구현하는데 쉽고, 편하게 구현할 수 있을 것 입니다.
Posted by happydong
, |


 IsolatedSterage는 무엇??

 Silverlight 애플리케이션을 만들다 보니깐 데이터를 임시적으로 저장할 필요를 느끼게 되었는데요. 알아 보니깐
IsolatedStorage 란것이 있다는 것을 알았어요. 일종의 가상공간(저장공간)이라고 생각하면 될 것 같아요.
그럼 IsolatedStorage를 어떻게 사용해야 하는지 알아 보도록 할게요. 혹시 전에 ASP.NET으로 파일을 생성하고 써보고 그랬더라면 더 쉽지 이해 할수 있지 않을까 생각이 듯네요. 전에는 FileInfo 클래스를 이용해서 파일을 생성했잖아요~!이것도 비슷합니다. 역시 열번의 말보다는 한번의 코드를 보는 것이 이해하는데 빠르겠지요^^
간단하게 Silverlight 예제 코드를 만들어 봤어요.


Page.xaml

<UserControl x:Class="IsolatedStorage_Test.Page"

xmlns="http://schemas.microsoft.com/winfx/2006/xaml/presentation"

xmlns:x="http://schemas.microsoft.com/winfx/2006/xaml"

Width="400" Height="300">

    <Grid x:Name="LayoutRoot" Background="White">

        <!-- 테스트를 위한 버튼 생성 -->

        <!파일생성 버튼 -->

        <Button Height="21" HorizontalAlignment="Left" Margin="24,23,0,0" VerticalAlignment="Top" Width="200" Content="Isolated Storage 생성" x:Name="btnsetfileinfo"/>
        <!—정보확인 버튼 -->

        <Button Height="21" HorizontalAlignment="Left" Margin="24,48,0,0" VerticalAlignment="Top" Width="200" Content="Isolated Storage 정보확인" x:Name="btngetfileinfo"/>

         <!—메세지 표시 텍스트블럭-->
   
   
<TextBlock Margin="24,0,176,8" Text="TextBlock" TextWrapping="Wrap" x:Name="txbText" VerticalAlignment="Bottom" Height="120"/>

        <!파일삭제 버튼 -->
   
   
<Button Height="21" Margin="24,73,176,0" VerticalAlignment="Top" Content="Isolated Storage 파일삭제" x:Name="btnfiledelete"/>

    </Grid>

</UserControl>


위 코드는 간한하게 버튼 3개와 텍스트블럭 1개로 이루어진 XAML 코드예요. 이 거는 간한하게 블랜드를 이용해서 만들수 있어요. 그리고 이벤트만 정의해 주면되겠지요.그럼  아래 .cs 코드를 보면서 설명하도록 할게요.


Page.xaml.cs

// Linq To XML 사용

using System.Xml.Linq;

// IsolatedStorage 사용

using System.IO.IsolatedStorage;

using System.IO;

namespace IsolatedStorage_Test

{

public partial class Page : UserControl

{

public Page()

{

InitializeComponent();


// Button Event

      // 파일쓰기 이벤트

btnsetfileinfo.Click += new RoutedEventHandler(btnsetfileinfo_Click)
// 파일읽기 이벤트

btngetfileinfo.Click += new RoutedEventHandler(btngetfileinfo_Click);
// 파일삭제 이벤트

btnfiledelete.Click += new RoutedEventHandler(btnfiledelete_Click);

}


/// <summary>

/// 파일 삭제

/// </summary>

/// <param name="sender"></param>

/// <param name="e"></param>

void btnfiledelete_Click(object sender, RoutedEventArgs e)

{

using (IsolatedStorageFile isf = IsolatedStorageFile.GetUserStoreForApplication())

{

// 파일있는지 확인

if (isf.FileExists("Test.xml"))

{

txbText.Text = "파일 있었으나 지금 삭제";

isf.DeleteFile("Test.xml");

}

else

txbText.Text = "파일없음";

}

}


    /// <summary>

    /// 파일 읽기

    /// </summary>

    /// <param name="sender"></param>

    /// <param name="e"></param>

void btngetfileinfo_Click(object sender, RoutedEventArgs e)

{

using (IsolatedStorageFile isf = IsolatedStorageFile.GetUserStoreForApplication())

{

// 파일 있는지 확인

if (isf.FileExists("Test.xml"))

{

XDocument xdocu = XDocument.Load(isf.OpenFile("MyPolder.xml", FileMode.Open));

var query = from el in xdocu.Descendants("Root")

select new

{

t = el.Element("Test").Value

};


string str = string.Empty;


foreach (var qy in query)

{

str = qy.t;

}


txbText.Text = str;

}

else

{

txbText.Text = "파일없음";

}

}

}


/// <summary>

/// 파일 쓰기 (Linq To Xml 쓰기)

/// </summary>

/// <param name="sender"></param>

/// <param name="e"></param>

void btnsetfileinfo_Click(object sender, RoutedEventArgs e)

{

using (IsolatedStorageFile isf = IsolatedStorageFile.GetUserStoreForApplication())

{

using (IsolatedStorageFileStream isfstream = new IsolatedStorageFileStream("Test.xml", FileMode.Create, isf))

{

using (StreamWriter sw = new StreamWriter(isfstream))

{

XElement element = new XElement("Root", new XElement("Test", "test..."));

sw.Write(element);

}

}

}

}

}

}


위 3개의 버튼이벤트는 각각 파일 생성, 읽기, 삭제 로 이루어 져있어요. 저는 XML파일을 만들어서 저장해 봤어요. XML파일로 저장해서 많이쓰지 않을까 해서...^^;; 이참에 Linq To XML도 써보려고요. 아무튼 IsolateStorageFile 클래스를 이용해서 파일을 생성합니다. IsolateStorageFile 클래스의 CreateFile 메소드를 이용해서 파일을 생성할수 있어요.FileInfo 클래스를 이용해서 파일을 생성할때와 비슷하다는 생각이 드네요^^. 이렇게 파일을 생성하고 StreamWriter 클래스를 이용해서 파일의 내용을 작성합니다. 그리고 파일을 읽을 때는 StreamReader 클래스를 이용해서 읽을수 있습니다. 여기서 저는 XML형태로 저장해서 Linq To XML를 이용해서 내용을 읽어 봤어요. 파일 삭제는 IsolateStorageFile클래스의 DeleteFile 메소드를 이용해서 삭제가 가능해요.
IsolateStorageFile 맴버 확인은 MSDN를 확인해 보시면 잘나와 있어요.

Posted by happydong
, |